Toilet Enclosure Ideas – After dealing with the grief of losing two grandparents in 30 days, I needed a small and simple project to get back to DIY groove. Our master bedroom is the perfect project to provide some distraction and a sense of control. Rule without feeling overwhelmed.
I know I want beautiful colors for this place. After testing a lot of bark and clare specimens, I chose Irony, a dark gray with a hint of blue. Lightweight. The project may have been sponsored by Clare, but I have become a huge supporter of the brand and their mission. Not only is Clare a black-owned business, but it also offers healthy options for home projects. Clare offers VOC-free paint, which means it does not emit harmful pollutants, has no toxic chemicals in the air and does not have to worry about EPA chemicals … Best when painting a small area. There is minimal ventilation.
Toilet Enclosure Ideas

I started by preparing the walls for painting. I wiped the walls with a damp cloth and covered the corners with Clara tape.
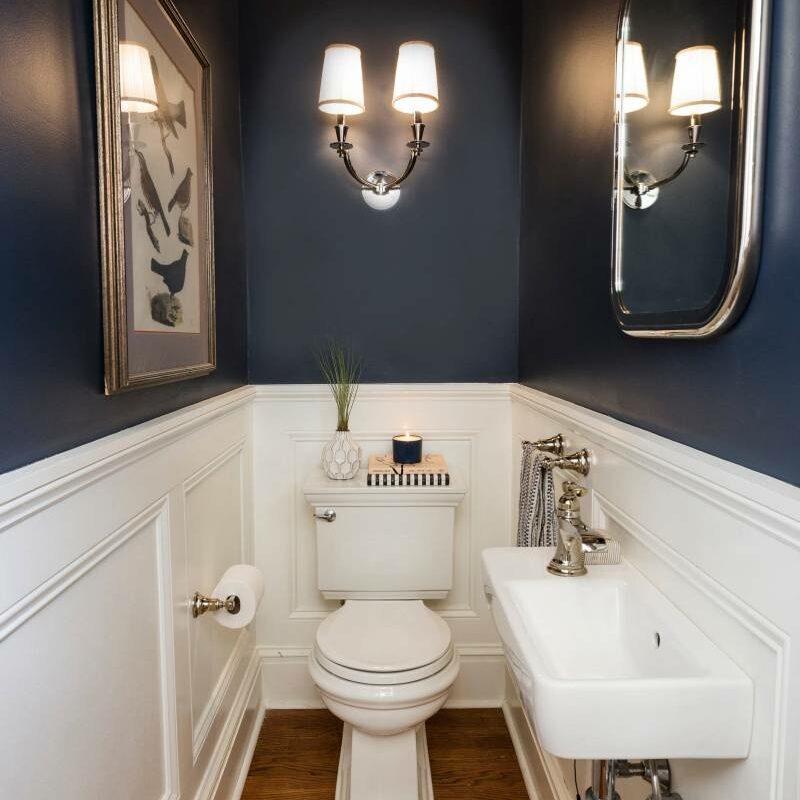
Powder Room With A Two Piece Toilet Ideas You’ll Love
While the artist’s tape does a decent job of creating a border between the two paint colors, the sealer is a true MVP and creates the cleanest and clearest paint line. No matter how I press the artist’s tape against the wall for a tight seal, there are always small air bubbles that are invisible, especially when working with textured walls. The colors pour into these tiny spaces and form uneven lines.
This is where the sealer comes in and does its magic. A sealant is a thick resin that is often used to seal cracks, crevices or joints between two objects to create a smooth transition and give the illusion of a perfect fit between the two objects. It is most commonly used to close a small gap between a wall and a wall desk and your floorboards or trim / skirt around your home. To create a clean paint line, I applied a sealant to the edge of the artist’s tape on the wall I was going to paint. I use a baby wipes or a damp cloth on the exfoliating layer. With that, I filled those small gaps with carpet so the paint could not penetrate.
Note that this technique only works if your adjoining walls are white (so the carpet can blend in with the existing paint color). For colored walls, I recommend painting an existing wall color on the edge of the wall panel you plan to paint (instead of painting Sealing). This will also fill in small gaps and close the gap between the tape and the wall. After this layer dries and paint it with a new color of varnish.
I repeated these steps for each corner / edge, ceiling and pedestal. It may seem like a tedious and unnecessary step after applying masking tape, but I promise it deserves extra work.
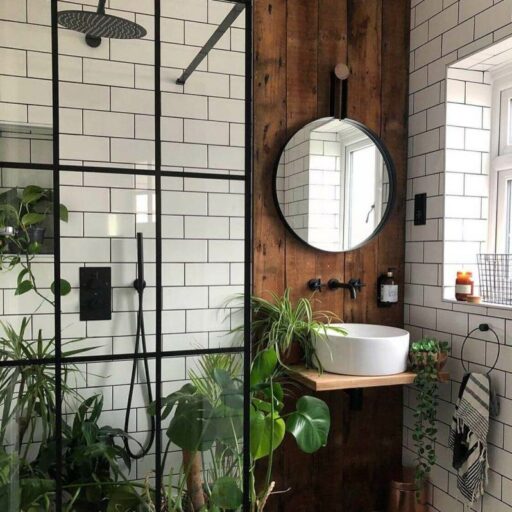
Refreshing Windowless Bathroom Ideas From The House & Garden Archive
As I wandered around in the audiobook and in the up-and-down motion picture, I accidentally tilted my paint pad too far and spilled some paint … and when I said “a little” I really Means “many”. The photo below does not do justice to the spill. It fills the toilet seat and the floor around the toilet. The paint dripped down my shirt as I left a dark gray spot next to the Opa sink … I thought I should use a towel. At least I wore my drawing shirt!
Thirty minutes and a piece of paper towel later, the floor was not clean and I continued to paint as if nothing had happened.
I have heard that some people have trouble using the toilet to paint the back wall. I did not expect to go through it all! To achieve this, I just used the Paint Behind tool from Amazon. It’s a stick with a thin sponge on one end … I added paint to one side of the sponge and carefully brushed the tool along the back wall of the toilet. Simple and ingenious solution!

Then my favorite part … Remove the tape! I want to show you all the differences between using the artist’s tape alone (without the edge seal) and Use the artist’s tape with a stamp. The difference is undeniable (see picture below). Isn’t it crazy what this extra step can do during the paint preparation process? Now I always use this sealing method when I draw.
Primary Bathroom Ideas To Covet Right Now
Next I make a wooden shelf. I do not want to spend money on wood anymore when I have a pile of scrap wood in the corner of our garage so I caught Take the two pieces of red wood left over from the Ottoman table project too much. I snapped the two pieces together using wood glue and pocket holes and cut my new shelf to the desired size (9 “x 39.5”). In a good world (and what I would recommend) I would buy a pre-cut piece of plywood (width between 6 and 10 inches depending on the shelf size you want) from the store and cut it at home. With a circular saw. But I’m glad I was able to save some money and distribute the funds elsewhere.
I used a miter saw to cut several 1x2s, one to the length of our toilet wall (39.5 inches) and the other two a few inches shorter than the width of my shelf (9 inches). I then screwed 3 1x2s into a C shape to create the brackets / supports for my shelf and used my angle brackets for the perfect 90 degree angle.
I attached the C bracket to the wall and made sure it was level. To do this, I screwed one side of the bracket to the wall at the height I wanted, placed the other side of the bracket using a level, and attached that part to the wall as well. I screwed the C-beam corners into the studs on the adjacent wall.
I sanded my red oak shelves with 80 grit sand to remove cracks, then 120 grit to smooth it out and 240 grit for the final touch, and painted the wood conditioner to prepare it for wood stains.
Small Bathroom Storage Ideas
I added some thin coats of classic Varathan gray stain, but felt the warm tone of the red oak tree at Tea has arrived. I finished with a thin coat of Minwax Slate Stain for a cooler tone. For both, I applied a very thin layer and wiped it off immediately to prevent saturation.
After the stain was dry and no more toxic odor (~ 3-4 days), I tilted the dirty pad against the bracket and nailed it to my bracket.
I tucked my 1 × 3 board in front of my shelf to cover the supporting parts and edges of the board. Eventually, I planned to put 25 inches of red oak nails under the shelf to cover the brackets at the bottom … but for now I can no longer see and with all my heart. I mean … how often? I went down to my desk and still stared at the bottom of the shelf?

After securing the shelves in place, I filled the yard with decorations I had collected from the Hobby Lobby over the years. .
Bathrooms With Beautiful Wall Decor That Will Inspire A Refresh
Now this place has more characters and more fun to hang out! The small rooms in the house are one of my favorite places to decorate, offering many opportunities to experiment with more exciting and attractive decor. From bold colors to vibrant patterns, these little spaces allow you to be bolder than where you spend most of your free time or work. With no barriers of existing furniture to incorporate or key features to consider, a small powder room allows for a new decorative project that can be started from scratch. It also allows you to skip boats when it comes to choosing decorative materials (it is more acceptable to buy this premium wallpaper when you only need two rolls instead of eight!)
In addition to decoration, when planning a small powder room, it is necessary to consider how to make the most condensed space in terms of functionality. Before you start planning your design, think about the storage space you need and consider the depth and width of your fixtures and fittings (you will want to use as much space as you have while you can still move). Easily. With these factors in mind, here are six stylish and smart bathroom decorating ideas to inspire you:
Many people want to be bold in their makeup choices and use stronger colors.